There are many situations where you want to save a copy of some data. The most common are:
- You have accessed the data over the internet and wish to keep a copy of all or some of the data
- You have filtered/subsetted the data and want only to use the subset in your further work
- You want to change the file format of the data or same it in another database.
- You have used an analysis tool that generates an “in-memory” output that you wish to make permanent
The procedure is more or less the same in all the above situations. There are some differences between:
- Vector Data
- Raster Data
Vector data
Right-click on the data layer in the layers panel, chose “Export” ->” Save Features as”

The “same Vector layer as” dialog box has really many optional fields for advanced users such as only sawing the data in the display or only saving some fields (attributes). I have here collapsed most options (the black triangles) to get a clear look at the dialogue.

First, choose the data format you want to save the data as (For most use, I highly recommend choosing GeoPackage), the other formats are primarily if you want to use the data in so other GISapp, and even here, GeoPackage is probably the best choice.

Now Choose where to save the data. It is important not just to type a file name in the “File name” field (This is a comment nuby error. What you must do is to click the button with the three dots (blue circle) and then use the navigation of your computer to locate the folder you wish to save in, and then type the filename (green). If you are using a database format such as GeoPackage, ane file can hold several data elements, You can, therefore, also choose an existing file if you wish to store the data together with some existing data.

You can now, in the layer name field (red), choose the name that the data is going to be given in the database. If you want to use another Coordinate Reference System (CRS) you can choose it in the CRS dropdown or from the CRS button (Blue). This is a more advanced option, you should only use it when needed. See the article on Coordinate Reference System

All is now well, and you can click ok to save the data. If there already is a layer with the given name in the database you will be presented with the option of what to do .

Overwrite file (red) will delete the existing database and replace it with a new one containing only the new layer. This is seldom what you want to to. Overwrite layer (Blue) will replace the existing layer with the given name with the now one, you chose this if you want to replace the data layer. Append to Layer (green) will add the data of the new layer to the data of the existing layer. This might be useful if the data represents the same thing but for different periods or areas.

Raster
Right-click on the data layer in the layers panel, chose “Export” ->” Save as”. To start of with ther are some options we need to cover. A raster file can be saved as ther rendered image (green) this is typalice what you want to do with images of scaned maps and the like for other data it is more likaly that you want to save the Raw Data, (Red). A Vitual Raster Tiles (Blue) saves the data as a folder with sevetal smaler raster files in it that are tiled together to form one large raster. This is typicaly used with wery large files.
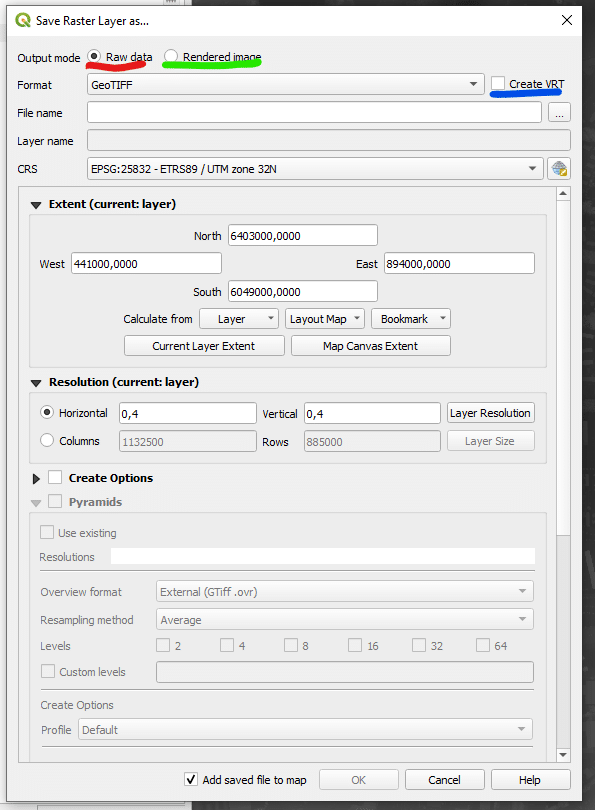
For Raster data ther are even more formats to chose from than with vector data. I recomend using etither GeoPackage, or a GeoTff (some operations meeds the data to be saved as GeoTiff). Like with vector data remember to use the button with the three dots to specify a folder and file name.

A commen situation is that you only want to save a smaler area of the raster data, and this is wher the ectent part of the dialog becomes important. You can specify the extent by entering in coordinates, althought this is selcom used. More commen options is to same the area desplaed on the screen so zoom an pan to the are you want. This is what is ment by Map Canvas Extent (red). If you are going to save teh same area often or genneraly need to find the same area often you can create a bookmark for the area (See the artike “Add a bookmark in QGIS“). Finaly it is also commen to have another layer that defines your area of intest. From the Layer button you can choose any loaded layer. As you select the sub area note how the numbers under collums change to reflect the size of the output raster.

Finaly press ok to save
